Optimized Guide: How to Root Tolino Vision 3 HD & Shine 2 HD on Firmware 1.7.2 for Full Android Access
The following instructions were written for firmware version 1.7.2. Use them only if you are still using this version.
For more recent firmware, follow the link to this guide.
It’s been over two years since I published a guide on rooting the first Tolino Shine here. This was made possible by the great groundwork of hacker “hecke.” With the following instructions, I build on that previous work because it now allows the newest eBook readers from the German book retail alliance—Tolino Shine 2 HD and Tolino Vision 3 HD—to be rooted.
With root access, you gain full access to the Linux or Android system. This means that, with the necessary background knowledge, you can change all kinds of things. On the eBook reader, additional app installations are usually the feature most desired by tinkerers and modders. This enables the installation of alternative reading programs and a variety of other useful (or less useful) things.
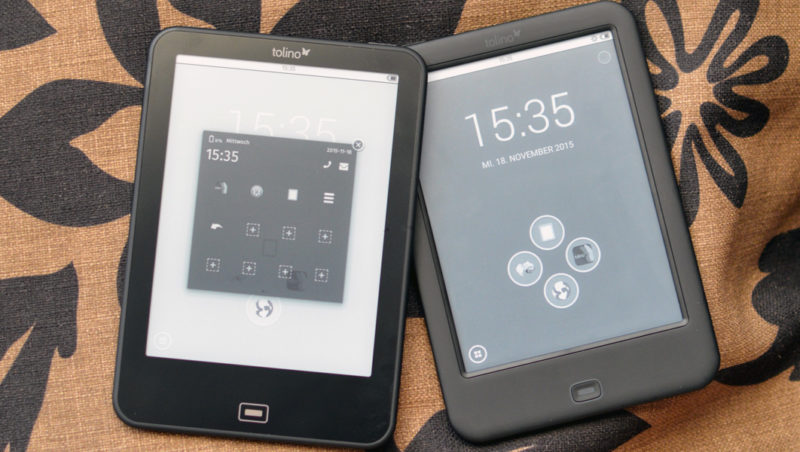
Both the Vision 3 HD and Shine 2 HD use Android as their operating system, specifically, the relatively modern Android 4.0.4. Google has now reached version 5 with the mobile OS, but fortunately, most apps still work just fine with version 4.
In this context, it’s nice to note that both new eReaders come with so-called “Retina” displays featuring a pixel density of 300 ppi. Additionally, the ghosting effect is very minimal (as mentioned in both reviews). This is also beneficial in Android operation.
Tolino Shine 2 HD & Vision 3 HD Root Video Demo
The following video shows the Tolino Vision 3 HD right after it has been rooted. You can see the first steps you can take after following the instructions. It also briefly shows the rooted Tolino Shine 2 HD.
Things to Know Before You Begin
Before we start, a few brief words on the procedure described. The installation of root access is possible because the so-called Fastboot mode is enabled on both Tolino models. This allows you to transfer your own images to the devices and activate ADB access. Subsequently, ADB access allows direct root access to the device. There is no need to open Shine and Vision, and no jailbreak is required to bypass any security measures.
The procedure is a bit different than with the first Tolino Shine root, but in the end, similar steps are carried out.
Here’s the familiar warning:
Having said that, I can say that I’ve performed the instructions multiple times on the Tolino Shine 2 HD and Tolino Vision 3 HD. The devices were repeatedly reset to factory settings, reflashed, and rooted over and over again. Apart from the stubborn ADB connection (see below), there were no problems.
The step-by-step guide is mainly structured to eliminate possible sources of error during the rooting process. All important steps are preceded by a check of the ADB connection. Execution is fundamentally very easy to follow and usually only takes 2 to 3 minutes.
It’s important to mention in this context that you should not install automatic (OTA) software updates after rooting. Root access will then be lost. As a result, you will have to execute the following instructions again. This will only work if Fastboot remains enabled in the new firmware version. If you’ve installed an update where Fastboot has been disabled by the Tolino developer, only serial access is possible (with the device open).
To prevent this, you need to manually apply future updates with modified images. When the time comes, the corresponding files, including instructions, will be available for download here.
Before starting, make sure to back up all eBooks and other files on the device for safety.
ALLESebook Root Package for Shine 2 HD and Vision 3 HD
The root package provided here was created based on the official firmware 1.7.2. It was successfully (several times) tested with the Tolino Shine 2 HD and Tolino Vision 3 HD with versions 1.7.2, 1.7.3, 1.7.4, and 1.8.2. This root package does not work for the Vision 4 HD.
The package contains the following files and folders:
- 1_images
- custom_boot.img
- custom_recovery.img
- 2_usb_driver
- DPInst_x64.exe
- DPInst_x86.exe
- …
- 3_adb
- su
- Superuser.apk
- z_cr_3.1.2.apk (Cool Reader)
- z_nook_clear.apk (Clear Screen for manual screen refresh)
- z_quick.apk (Quick Launcher – virtual buttons)
- z_smartlauncher.apk (Smart Launcher – home screen)
- z_tcandroid202.apk (Total Commander – file explorer)
- …
- 1_MANUAL
- 2_INSTALL_usb_drivers.bat
- 3_INSTALL_vendor_id.bat
- 4_TEST_fastboot.bat
- 5_BOOT_adb.bat
- 6_TEST_adb.bat
- 7_INSTALL_update.bat
- 8_TEST_adb.bat
- 9_INSTALL_su.bat
Step-by-Step Instructions
First, install “2_INSTALL_usb_drivers.bat“. It automatically distinguishes between 32-bit and 64-bit systems. You need to click through the installation as it proceeds. Once it’s complete, you can close both windows (Figure 1).

Figure 1: ADB Driver Installation
Now start the file “3_INSTALL_vendor_id.bat” from the root package. This adds the necessary device IDs for ADB access (Figure 2).
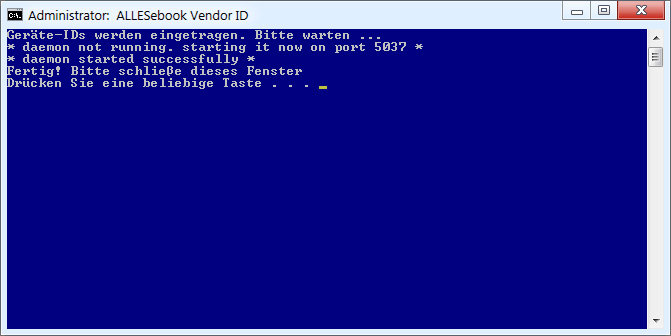
Figure 2: Vendor ID is entered
Once done, connect the powered-on Tolino Shine 2 HD or Tolino Vision 3 HD to the PC via USB. The battery should ideally be (almost) fully charged for the following steps.
Now switch off the eBook reader completely. To do this, hold the power button for a long time and select “Turn Off” in the pop-up window. Keep the USB cable plugged in during this time.
After the device has completely shut down, first press the light button (top right) and then the power button (top left), holding both buttons simultaneously for about 5 seconds. On the Tolino Vision 3 HD, the home button briefly lights up, and on the Tolino Shine 2 HD, only the LED in the power button lights up.
Now open the Control Panel and Device Manager on your PC. Under “Other Devices,” you should now see a “tolino” entry. At the moment, it’s marked with an exclamation mark. If this entry is missing, plug the USB cable into a different port and wait a moment. The Tolino eReader should now appear in Device Manager (see screenshots in Step 7). If not, go back to Step 2 and follow the instructions again. Leave Device Manager open after the successful installation – it will be needed again later.
Now you need to associate the eBook reader with the ADB drivers. Follow the steps in the image sequence shown below. At the end, instead of “tolino,” a new entry “Android Phone” with “Android ADB Interface” should appear in the Device Manager.


To test if everything has worked so far, start the file “4_TEST_fastboot.bat” from the root package. The output should look like the following image (Figure 3) (“12345 fastboot“). If only the prompt to press any key appears (without the Fastboot line), the driver installation didn’t work—in this case, go back to Step 6.
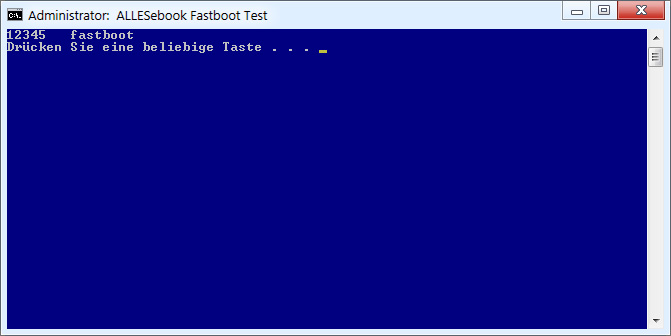
Figure 3: Fastboot Test
In the next step, we will start the Tolino Shine 2 HD or Tolino Vision 3 HD with a custom recovery image. Since both devices share an identical firmware, you can use the exact same files for rooting. Open “5_BOOT_adb.bat” and confirm the questions. Shortly after the eReader restarts (Figure 4). If an error occurs here (“failed”), plug the USB cable into another port and run the file again.
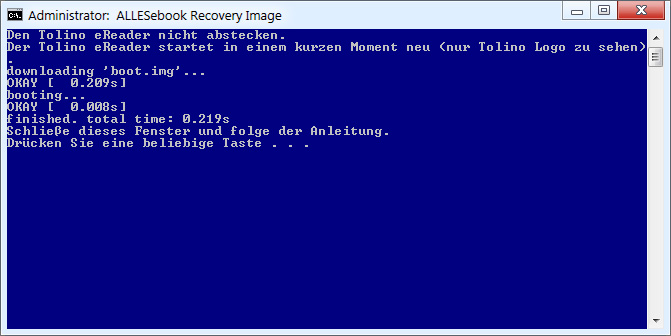
Figure 4: Recovery Image with ADB is launched
On the eBook reader’s screen, only the Tolino logo is now visible (Figure 5).
Figure 5: Only the Tolino logo is displayed
Now return to the Device Manager on the PC. As in Step 6, you should now see either the previously installed Android ADB Interface or the “tolino” entry with a yellow exclamation mark. If both are missing, plug the USB cable into another port again. Then proceed as described above and associate the ADB drivers again if necessary.
Use the file “6_TEST_adb.bat” to test whether Shine or Vision are detected via ADB. A long string of numbers and letters with the note “recovery” at the end of the line should appear (Figure 6). If that’s not the case, the driver installation didn’t work – in which case go back to Step 11.
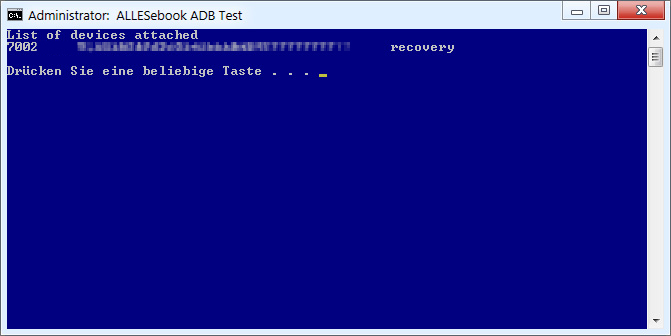
Figure 6: ADB Test “recovery”
Install Root Access Permanently
Now we come to the actually crucial (and critical) point. The previous preparation has not made any permanent changes. By starting “7_INSTALL_update.bat“, you install a custom boot image that permanently enables ADB access. After answering the two initial questions, the flashing process starts automatically. This usually takes less than a minute. After that, the device restarts (Figure 7).
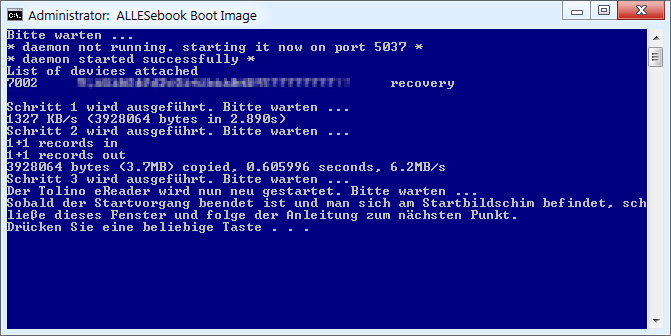
Figure 7: Boot Image with ADB is flashed
After a short wait, you should find yourself back at the startup screen of the Tolino Shine 2 HD or Vision 3 HD. Nothing has been changed here – i.e., all eBooks you previously had on the device are still present.
The previous step enabled permanent ADB access. Now the actual root access directly on the device is still missing. For this, switch to the Device Manager on your PC one last time and look for the Android ADB Interface again. If the entry is missing, plug the USB cable into another port again. Once that is done, the entry should appear. If the “tolino” entry with an exclamation mark reappears, associate the ADB drivers as described in Step 7.
Once that’s done, test the ADB connection again with the file “8_TEST_adb.bat“. A string of numbers and letters should now appear, with “device” at the end of the line (Figure 8). If that’s not the case, go back to Step 15.

Figure 8: ADB Test “device”
Finally, we come to the last point: By executing “9_INSTALL_su.bat“, you gain root rights and install a handful of applications. This usually takes less than 5 minutes (Figure 9).

Figure 9: Superuser and App Installation
In the end, the Tolino Vision 3 HD or Shine 2 HD restarts automatically. After booting up, you’ll be welcomed with the launcher selection. Since the Android system hasn’t been adapted for the E-Ink display, some dialogues are not visible (white text on a white background). Fortunately, this doesn’t occur too often.
And that’s it. Your Tolino eBook reader now has full root access with some preinstalled basic programs.

Done! The Tolino eReader is now rooted.
Further Steps
Finally, a brief explanation for the first start. The video shown above already demonstrates the first steps:


The checkbox to set the default is invisible
It’s best to choose Smart Launcher as the default home screen. Click on the invisible checkbox (see the video above and the image on the right) and select the first option. Once that’s done, you’ll land on the new home screen at every system start.
- Then open the app drawer (bottom left) and start OneToucher. The program offers floating menus, so you can easily switch between applications. You can move the symbol’s position with your finger.
- Nook Clear Screen is a simple app that allows you to fully refresh the E-Ink screen. This is useful if another app causes severe ghosting. A shortcut to this is available in OneToucher immediately after rooting, allowing quick access from anywhere.
- When you access the Tolino interface for the first time after a restart, it opens in the browser. On subsequent accesses, the Tolino home screen opens.
- If you wish to copy eBooks or files to the eReader’s internal storage, the Tolino app must be running in the foreground. Otherwise, mass storage recognition on the PC won’t work correctly.
- If you want to add more apps, you must sideload them. How this works is explained in this article.
- With a bit of tinkering (removing the back), you can also replace the internal SD card of the Shine 2 HD and expand the storage space. How this works is described in this article.

So, now we are truly at the end. The Tolino Shine 2 HD or Tolino Vision 3 HD is rooted and can be used as a high-quality E-Ink tablet. Although the Android system hasn’t been specifically adapted for the E-Paper screen, the display of most apps works surprisingly well.
So, have fun!
If you have questions or suggestions, just leave a comment on this article!
Haven’t got either eBook reader yet? You can buy them here and support ALLESebook.de: